For a very long time I had an issue with line breaks in markdown. I ended up doing either quotes or code blocks.
Finally, today I learned that the proper way is to end a line with double spaces.
So
it
looks
like
this!
That’s all folks…
For a very long time I had an issue with line breaks in markdown. I ended up doing either quotes or code blocks.
Finally, today I learned that the proper way is to end a line with double spaces.
So
it
looks
like
this!
That’s all folks…
This is gonna be a long blog-post, so bare with me.
I started blogging in February of 2014. A friend of mine, my mentor, norayr, got me my first domain, pingvinashen.am (literally means: the town of penguins), because I did not have money back then. I started hosting WordPress on it, tried to blog as much as I can, anything from technical knowledge to personal opinions.
Over the years I moved from a WordPress blog to a statically generated website using Hugo, and then I started an English blog with the same framework as well.
This worked all fine for me, because everyone was doing the same and it did fulfill my needs anyway.
Until I realized that many of my title-less posts (actually, the title was just »»») were kinda “icky”.
So I started researching about the origins of blogging. Now, I already knew about Adam Curry and how he started the PodCasting “industry”, but I never knew about blogging itself.
Obviously, I found DaveNet, the oldest running blog.
Currently, Scripting.com (Dave Winer’s updated blog) has been running for: 27 years, 6 months, 9 days, 21 hours, 20 minutes, 42 seconds. (taken from his website).
Learning more about Dave, I learned a lot about the origin of OPML, which stands for Outline Processor Markup Language. I knew a bit about it since it’s the standard format to export and import RSS/Atom feeds into news aggregators, but I never actually KNEW what it was about. If you are interested, checkout opml.org/Spec2.opml.
My interest of OPML got boomed when I saw my favorite blogger, Rubenerd, was using it for his Omake page.
Okay, so you can host OPML pages WITH styling using XSLT, the Extensible Stylesheet Language Transformations language.
As you know, I’m a huge fan of XML, while it’s not as “modern” as JSON or “cool” as YAML, I think it has a proper place for its usage. This seems to be one of them.
I started copying Rubenerd’s XSL file and ended up with this, which is not close to it anymore. I learned about recursive calling, templating with matches, etc.
First, I would love to tell you that my homepage is finally made in OPML+XSLT. Here’s my process:
xsltproc (part of macOS base, BTW) to generate an HTML outputDoes this sound similar to static site generators? Because it is, except that static site generators have their own templating language, while in this case, I’m using XSLT.
Okay, let’s talk more about the details.
First, I was using Zavala, my outliner of choice for Apple-ecosystem. First issue was that the links in there are markdown (which is [text](link)). The second issue was that (and I’m not sure about this) I was not able to edit the attributes of a node/outline.
I wanted to use Drummer, but I didn’t want to log-in with Twitter to use it. I’ve had issues with Twitter in the past, where they deleted my 6-year-old account in 2015.
Luckily, there’s a version called Electric Drummer (hereafter D/E), it’s a bit outdated, but it was good enough for my needs.
First thing first, I “converted” my homepage to OPML.
After that I wrote the XSLT code.
The xsltproc tool is actually very interesting, the usage is pretty simple and it follows the standards very well. The error messages are pretty human readable.
On my first try, I had an issue with links, as in <a HREF=""> tags, because XSLT does not allow < in the field by default. So my idea was to see what would D/E do after saving. Turns out it would convert to HTML encoded text, i.e. <a href="https://antranigv.am/">antranigv</a> . Which meant that I could use disable-output-escaping to achieve my <a> tag needs.
This got me thinking, maybe I could also use the HTML <img> tag?
Technically, there’s no way to add an image tag in D/E, however, you can script your way around it, so here’s what I did:
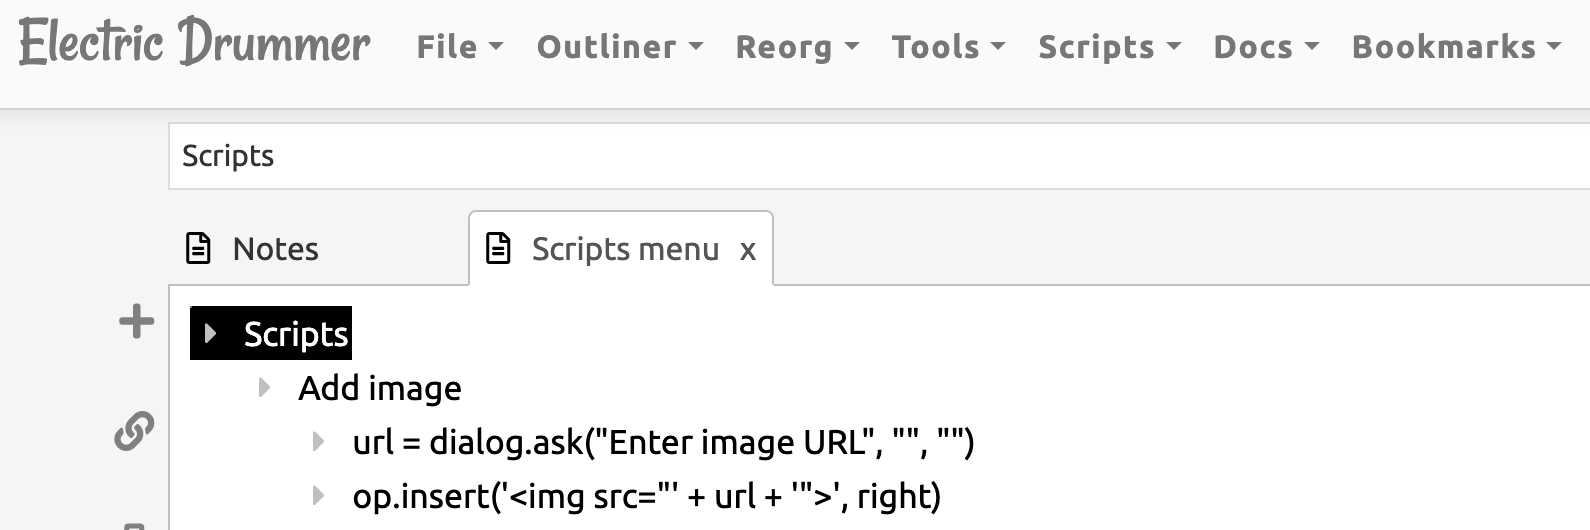
<outline text="Add image" created="Mon, 11 Apr 2022 23:37:14 GMT">
<outline text="url = dialog.ask("Enter image URL", "", "")" created="Tue, 12 Apr 2022 21:45:09 GMT"/>
<outline text="op.insert('<img src="' + url + '">', right)" created="Tue, 12 Apr 2022 21:46:01 GMT"/>
</outline>
Basically, I used Dialog to ask the user for the link and then paste the outline as a new first child of the bar cursor.
After that I just do xsltproc -o index.html opml.xsl index.opml. Wait, can’t I just include the XSL page into OPML like Rubenerd’s Omake? Yes, I can, but I’m not sure how things will work out in other people’s browser, so I just generate the HTML file locally and publish it remotely.
In an ideal world, I would use these technologies for my day-to-day blogging with a bit of change.
dialog.form, which is similar to dialog.ask, where the input can be a text field instead of a single line (more on that later)publish.sh) or add more Node-like JS in it.Assuming I would use this for my day-to-day blogging software, how would this look like? Well, I started experimenting, this is what I got for now.
The nice thing about Drummer is that it adds the calendarMonth and calendarDay types automatically.
The last missing piece for me would be the ability to add a code block. Ideally, I would use dialog, but oh boy it does not understand \n or \r, which meant doing a very dirty hack. If anyone knows a better way, please let me know.
First, I wrote a Drummer script that takes in the code encoded as base64, decodes it, replaces the newlines with <br/>, and puts them in a <code><pre> tag as a new first child of the bar cursor. Here’s the script:
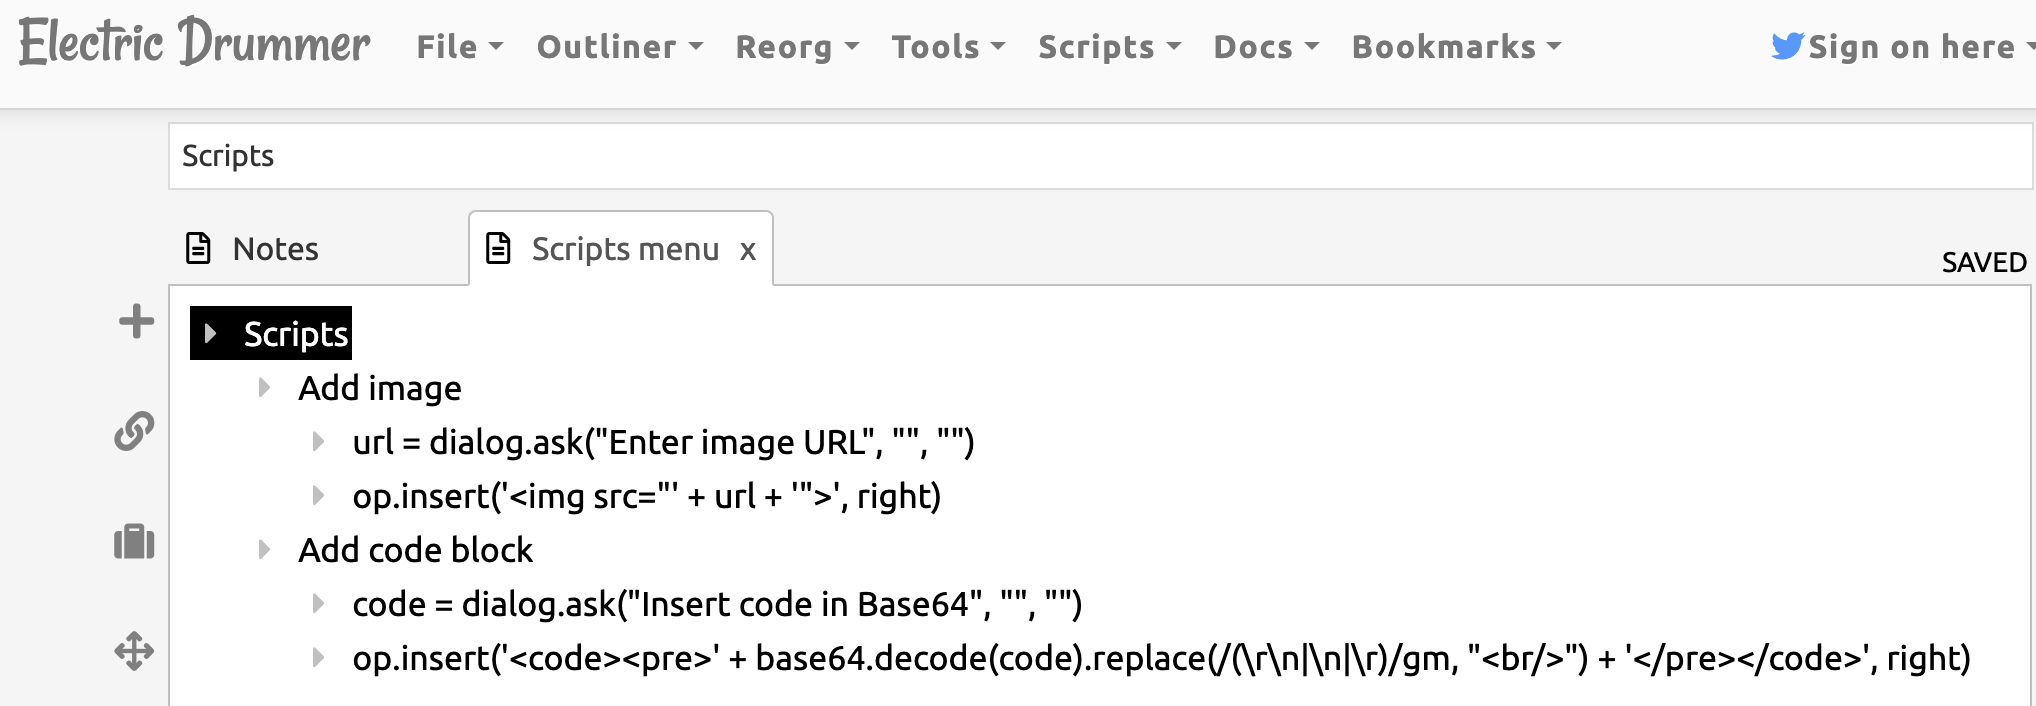
Like I said, in an ideal world 🙂
So, here are my conclusions.
I started tinkering with all this because I wanted title-less posts like Dave (here’s an example of how that would look like in RSS). I learned a lot about OPML and XSL, I got motivated by Rubenerd to write my own XSL which ended up looking like a mini-hugo.
I think I will spend some time making patches to Electric Drummer and Zavala, and I will try building a PoC for blogging.
I think XSLT is very interesting in this day and age, it has a huge potential when used correctly and most importantly, there’s a lot of history behind it.
The questions is, where do we go from here? Should I do this because it’s old-school and cool, or should I find another way to blog more with title-less posts?
All that aside, this was very fun.
Thank you for reading.
P.S. If you have any questions, ideas, suggestions or want to chat with me, I’m always available.
That’s all folks…
I develop and run my code on different machines. We have a centralized storage in our infrastructure which can be mounted via NFS, SSHFS or SMB.
The “problem” is that the remote servers, which also mount my remote home (automatically, thanks to AutoFS), don’t have my keys, they never should, the keys are only in one place, my laptop. The keys that I need to commit are my SSH keys for Git push and my GPG keys for signing those commits.
The usual problem was when I git pull on the development server needs to be an HTTP URL, internally accessible for the mentioned server. Which mean that I can’t git push from my laptop, because we don’t allow pushing via HTTP(s).
At the same time, if I set the URL to an SSH URL, then git pull will not work on the development server, because it does not have my SSH keys.
I know that I can set multiple remotes in git, but how about setting a different URL for a remote’s push and pull?
Turns out that’s doable!
It’s also very simple:
First, we clone using the accessible HTTP URL
git clone https://my.git.server.local/myuser/myrepo.git
Then we set the URL only for pushing
git remote set-url --push origin git@my.git.server.local:myuser/myrepo.git
And now let’s check the remote addresses
% git remote -v
origin  https://my.git.server.local/myuser/myrepo.git (fetch)
origin  git@my.git.server.local:myuser/myrepo.git (push)
Yey, exactly what I needed!
That’s all folks…
After deploying Huginn I wanted to connect my Twitter accounts, so every blog post would be automatically tweeted.
The problem is, there seems to be an issue in the Twitter Service either in Huginn or at Twitter. which I’m sure someone is working on fixing it.
However, I was able to find a workaround by using Twurl, a curl-like application for interacting with the Twitter API.
You will need to do a couple of things.
ENABLE_INSECURE_AGENTS set to true in Huginn’s .envtwurl. It was not available as a FreeBSD package, I installed it using RubyGems: gem install twurlNext, you need to authorize your app (commands from Twurl’s README.md) with the same Unix user that’s running Huginn;
twurl authorize --consumer-key key       \
                --consumer-secret secret
And now we need to set up a new Shell Command Agent.
Now, I had to spend a lot of time to make it work, the command-line options are very… sensitive.
This is what I ended up with;
{
  "path": "/",
  "command": [
    "/usr/local/bin/twurl",
    "/2/tweets",
    "-A",
    "Content-type: application/json",
    "-d",
    "{\"text\": \"{{title}} | {{url}}\\n{{content | strip_html | replace: '\\n', ' ' | truncate: 128}}\"}",
    "-t"
  ],
  "unbundle": "true",
  "suppress_on_failure": false,
  "suppress_on_empty_output": "false",
  "expected_update_period_in_days": 15
}
Let’s go one by one.
The path does not matter, as we’re not interacting with files.
I am running FreeBSD so my twurl command path would be /usr/local/bin/twurl. You may run which twurl to find yours.
The /2/tweets is the resource we’re sending a request to, -A is for headers, and -d specifies the data of the body (hence, implies it’s a POST method).
My sources are RSS feeds, so I’m using things like {{title}} and {{url}}, you can do whatever you want. Since I’m inserting a JSON in the JSON, I had to use \\n so it converts to \n in the command. Be careful about that.
In the end, -t will “trace” the command, so we can see (if needed) the POST request as well as the result.
The unbundle parameter tells Huginn to not use the Ruby Gems that are in Huginn, instead, the command is run in a clean environment, outside of Huginn’s bundler context.
I left everything else as is.
Now, you can tweet from Huginn.
NOTE: You can use the
-uflag withtwurlto specify which account to use, refer to Changing your default profile for more info about that.
And now, all works fine.
That’s all folks…
Huginn is probably the best automation software that I’ve ever seen. It’s not only easy to use, but also easy to deploy and easy to extend. Unfortunately there’s no FreeBSD port for it, but looks like it’s something wanted by the community, at least according to WantedPorts.
I realized that I have at least 5 accounts on IFTTT, which is also an amazing automation service. However, 3/5 of these accounts were not “my own”. It belonged to our communities. You know, Meetups in Armenia and news listing websites similar to Lobste.rs. So if I get hit by a bus, it will be very hard for our community to operate these accounts, that’s why I wanted to deploy Huginn.
Like a sane person, I deploy in FreeBSD Jails (I recommend you do too!). Which meant there’s no official (or maybe even unofficial?) docs on how to deploy Huginn on FreeBSD.
It’s written in Ruby, which means it should work and should be very easy to ports. I’ll go over the deployment needs without the actual deployment, setup of Jails, or anything similar. Let’s go!
First thing first, you need Ruby thingies:
Here’s the full command for copy/paster:
pkg instal ruby rubygem-bundler rubygem-mimemagic rubygem-rake rubygem-mysql2
Next, you’ll need gmake for makefiles and node for assets:
pkg install gmake node
This should be enough. I’m also going to install git-tiny so I can follow their updates with ease.
pkg install git-tiny
Okay, let’s make a separate user for Huginn.
pw user add huginn -s /bin/tcsh -m -d /usr/local/huginn
Let’s switch our user
su - huginn
Okay, now I’m going to clone the repo 🙂
git clone --depth=1 https://github.com/huginn/huginn/
At this point you can go do installation.md#4-databases and configure your database.
You should also do cp .env.example .env and configure the environment, make sure to set RAILS_ENV=production
Next, as root, you should execute the following
cd /usr/local/huginn/huginn/ && bundle install
You might get an error saying
In Gemfile:
  mini_racer was resolved to 0.2.9, which depends on
    libv8
Don’t panic! That’s fine, unfortunately it’s trying to compile libv8 using Gems. Even if we installed the patched version of v8 using pkg, it still doesn’t work. I’ll try to workaround that later.
I an ideal world, all of these Ruby Gems should be ported to FreeBSD, I’m not sure which are ported, so I’ll just be using the bundle command to install them. And that’s why we use Jails 🙂
Anyways, the dependency Gem is mini_racer, comment its line in Gemfile
#gem 'mini_racer', '~> 0.2.4' # JavaScriptAgent
Now let’s run Bundle again
cd /usr/local/huginn/huginn/ && bundle install
Okay! everything is good!
Let’s also build the assets, this one should be run as the user huginn
bundle exec rake assets:precompile RAILS_ENV=production
NOTE: If you get the following error
ExecJS::RuntimeError: ld-elf.so.1: /lib/libcrypto.so.111: version OPENSSL_1_1_1e required by /usr/local/bin/node not foundthen you need to upgrade your FreeBSD version to the latest patch!
Aaand that’s it, everything is ready.
For the rest of the deployment process, such as the database, nginx, etc., please refer to installation.md
Currently, I’m running Huginn in a tmux session running bundle exec foreman start, but in the future, I’ll write an rc.d script and share it with you, too.
That’s all folks.
I was setting up Huginn on FreeBSD, I needed to do some manual testings of commands before I automate them, one of them was using twurl to Tweet. When I was trying to tweet in Armenian, the terminal prompt was giving me a bell. I realized that I needed to change the locale.
When I opened another shell to change the locale, FreeBSD’s fortune printed the following:
In order to support national characters for European languages in tools like
less without creating other nationalisation aspects, set the environment
variable LC_ALL to 'en_US.UTF-8'.
Ah, thank you!
By the way, if you ever saw a fortune that you liked and you needed it later, but didn’t remember the details, you can do fortune -m pattern freebsd-tips, here’s an example:
% fortune -m USB freebsd-tips
%% (freebsd-tips)
If you need to create a FAT32 formatted USB thumb drive, find out its devicename
running dmesg(8) after inserting it. Then create an MBR schema, a single slice and
format it:

# gpart create -s MBR ${devicename}
# gpart add -t fat32 ${devicename}
# newfs_msdos -F 32 -L thumbdrive ${devicename}s1

                -- Lars Engels <lme@FreeBSD.org>
Cheers.
So we have this build machine (build0) where we build FreeBSD in Jails and then we mount the src and obj dirs via NFS or we sync them using rsync to destinations so we can run make installworld on not-so-powerful servers.
Couple of days ago we had a network issue at the data center, the switches crashed and we had to reboot them. Turns out I was running rsync on one of our servers, so I decided to make sure that the files were copied.
Like a lazy sysadmin, I run the following commands on both the build0 server, as well as the remote host.
root@build0:~ # du -h -d 0 /usr/local/jails/f130/usr/obj/
 13G    /usr/local/jails/f130/usr/obj/

root@illuriasecurity:~ # du -h -d 0 /usr/obj/
5.5G    /usr/obj/
Hmm, maybe files were not copied properly? So I remove the obj dir and I rsync again.
Looks like the size is 5.5G AGAIN!
So I do a little bit of piping!
root@build0:/usr/local/jails/f130/usr/obj # find . | sort > /tmp/obj_build0.txt

root@illuriasecurity:/usr/obj # find . | sort > /tmp/obj.txt

zvartnots:~ $ scp illuria:/tmp/obj.txt  /tmp/
zvartnots:~ $ scp build0:/tmp/obj_build0.txt /tmp/

zvartnots:~ $ diff /tmp/obj.txt /tmp/obj_build0.txt
Um, no difference?
Looks like the size reported by du was… confusing?
Okay, let’s check the manual of du(1):
     -A		Display the apparent size instead of the disk usage.  This	can be
     		helpful when operating on compressed volumes or sparse files.
Oops, looks like ZFS compression is enabled on my machine…
Let’s try this again!
root@build0:~ # du -h -d 0 -A /usr/local/jails/f130/usr/obj/
 12G    /usr/local/jails/f130/usr/obj/

root@illuriasecurity:~ # du -h -d 0 -A /usr/obj/
 12G    /usr/obj/
Ok! This makes more sense 🙂
Let’s also check with ZFS.
root@illuriasecurity:~ # zfs get compression zroot/usr
NAME       PROPERTY     VALUE     SOURCE
zroot/usr  compression  lz4       inherited from zroot
I wonder what’s the build0 server is doing?
root@build0:~ # zfs get compression zroot/usr
cannot open 'zroot/usr': dataset does not exist
Hn o.O ? Oh yeah, I wonder.
root@build0:~ # mount | grep ' / '
/dev/ufs/rootfs on / (ufs, local, journaled soft-updates)
Okay, this makes much more sense now 🙂
That’s all folks!
This is another migration story, like the one that I wrote back in 2020. Unlike the other story, the motivation of this migration is totally different. It’s emotional instead of technical.
Last year a friend of mine got a new job that I referred her to. She passed the interviews and I helped her to get on-boarded as the employer was a friend of mine and I was pretty familiar with their product. The job was remote and she didn’t have a good laptop. Since I have many laptops I ended up giving her my ThinkPad T480s where she ran Ubuntu. As you can tell the employer was a VERY close friend of mine 🙂
All of this meant that I moved back to my MacBook Pro running macOS. I used to like macOS, for me it was always a rock-solid UNIX system with a proper graphical interface.
Unfortunatly these years the UNIX part is not solid anymore and the graphical interface is more iOS-y eye candy than a proper desktop interface.
But I was okay with that, since I spent most of my time in a terminal running vim, ssh, etc. I’d run typical work apps like Mail.app with GPGSuite and a Slack browser client.
But then something snapped in me. I think it was after the car accident. I spent two weeks at home, not able to work. So I started coding on my open-source projects again, doing some patches in FreeBSD, improving code on software that I like and so on.
I realized that I’ve been an Open Source advocate for years, and yet I was in the Apple ecosystem. Not that I don’t like the Apple ecosystem, don’t get me wrong, but as someone who’s been telling the government to use open source, helping them migrate, giving lectures to students about the open source movement and its history, I felt… bad.
I had this MacBook Pro laptop and this iPhone that both control me more than I can control it.
I contacted my friend again, asking if we can swap the laptops and she told me yes. She actually ended up working at our company and now she has a fancy new MacBook Pro while I came back to my lovely ThinkPad T480s running FreeBSD like I wanted in the first place.
As I mentioned, this time it hit me hard, so I decided to escape non-OSS things completely and now I’m running a Pixel 2 with Lineage OS.
There’s a whole story on how I got that Pixel 2 at this day and age and that story is coming soon. And the funniest thing is, as soon as I completed my transaction/migration to Open Source, I got the news that Apple Pay will finally work in Armenia.
Open Source changed my life when I was a kid in Syria, I learned more about computers because of Open Source and while I got distracted with the cute and nice macOS for a while, it’s time to come back home.
Here’s a screenshot
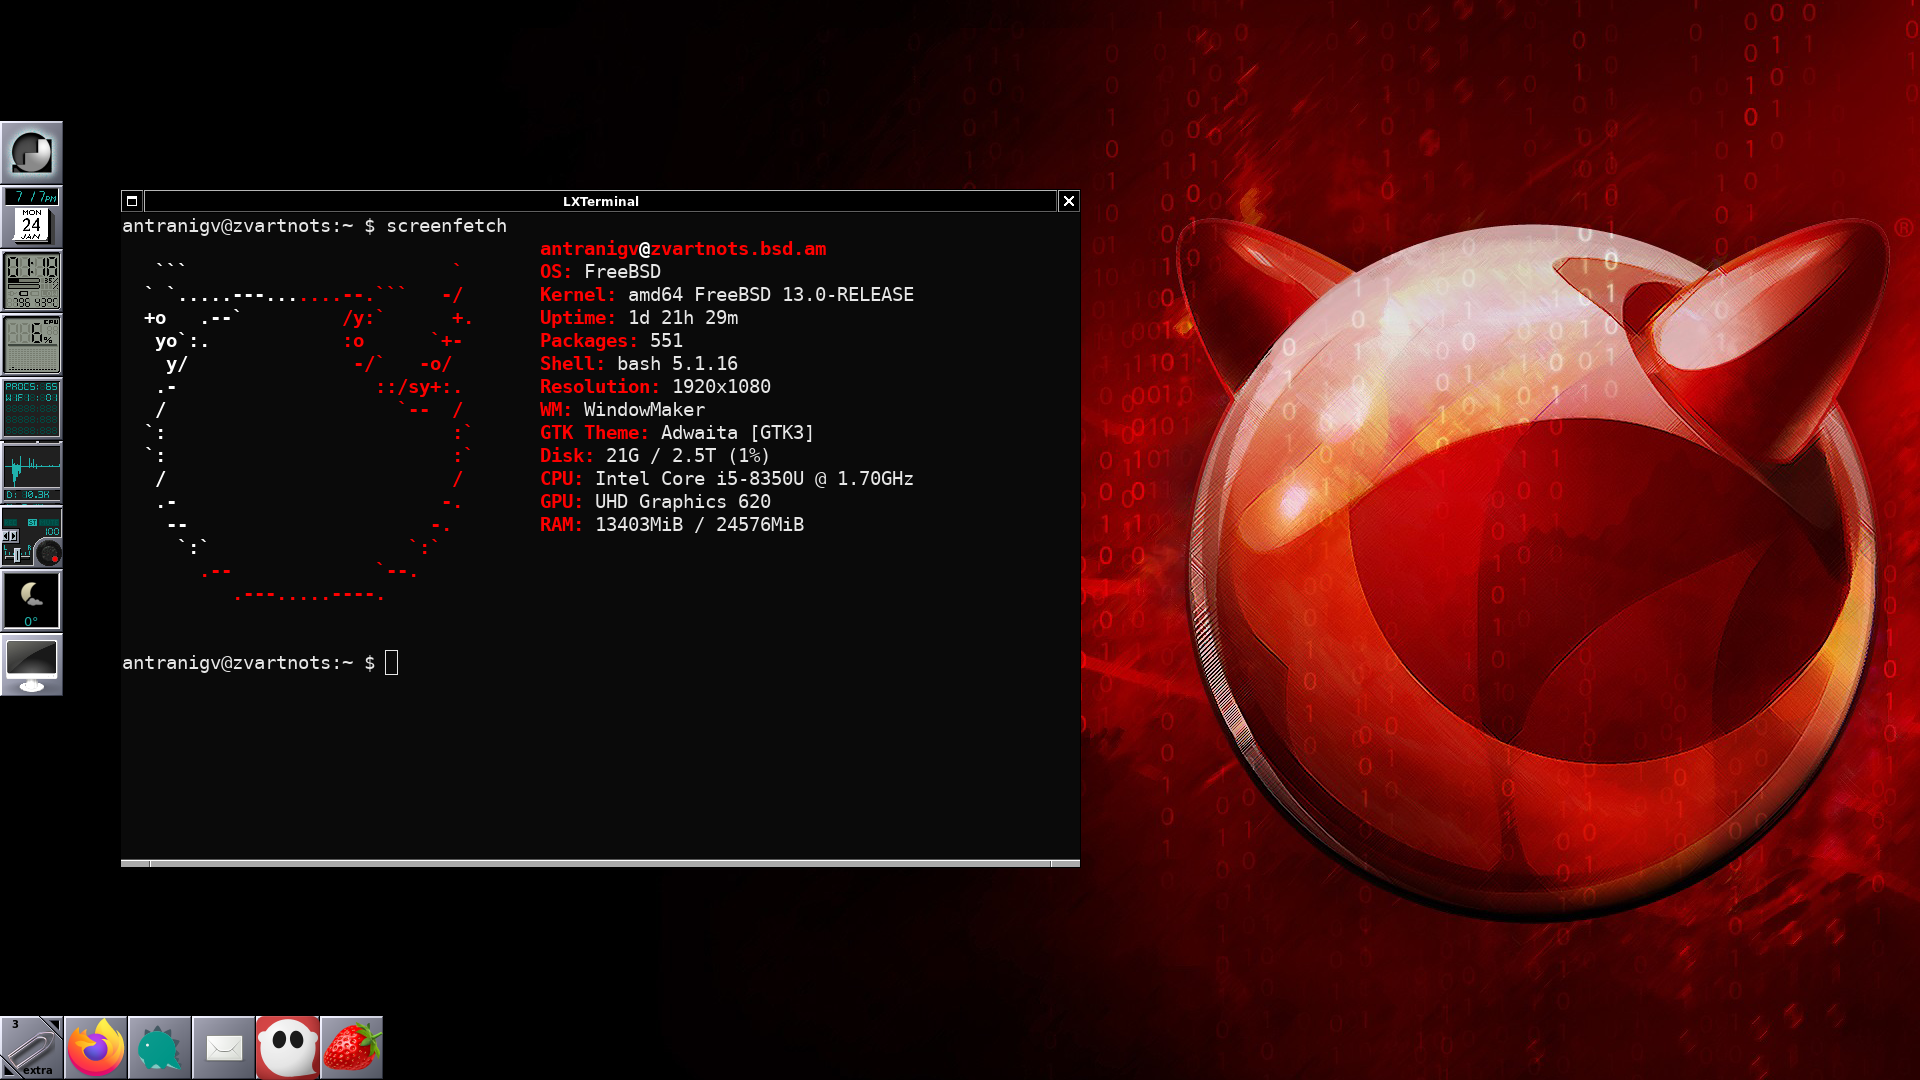
That’s all folks!
Bryan Cantrill has this amazing talk about debugging where he tells the story of Three Mile Island.
After watching that talk all I thought was “well, let’s hope this doesn’t happen in my life”, and by “my life”, I meant my personal or work server, not my AFK life!
55 days ago my girlfriend and I moved to a new apartment downtown the capital. I like everything about this house, specially that many things are electric, including the stove.
Like a sane person, when I see a stove with multiple levels (1, 2, 3) I assume that the lowest number is the lowest and highest number is the highest.
Now you’d think and say “Antranig, didn’t you notice that your cooking was talking 2 hours, so there must be something wrong?”
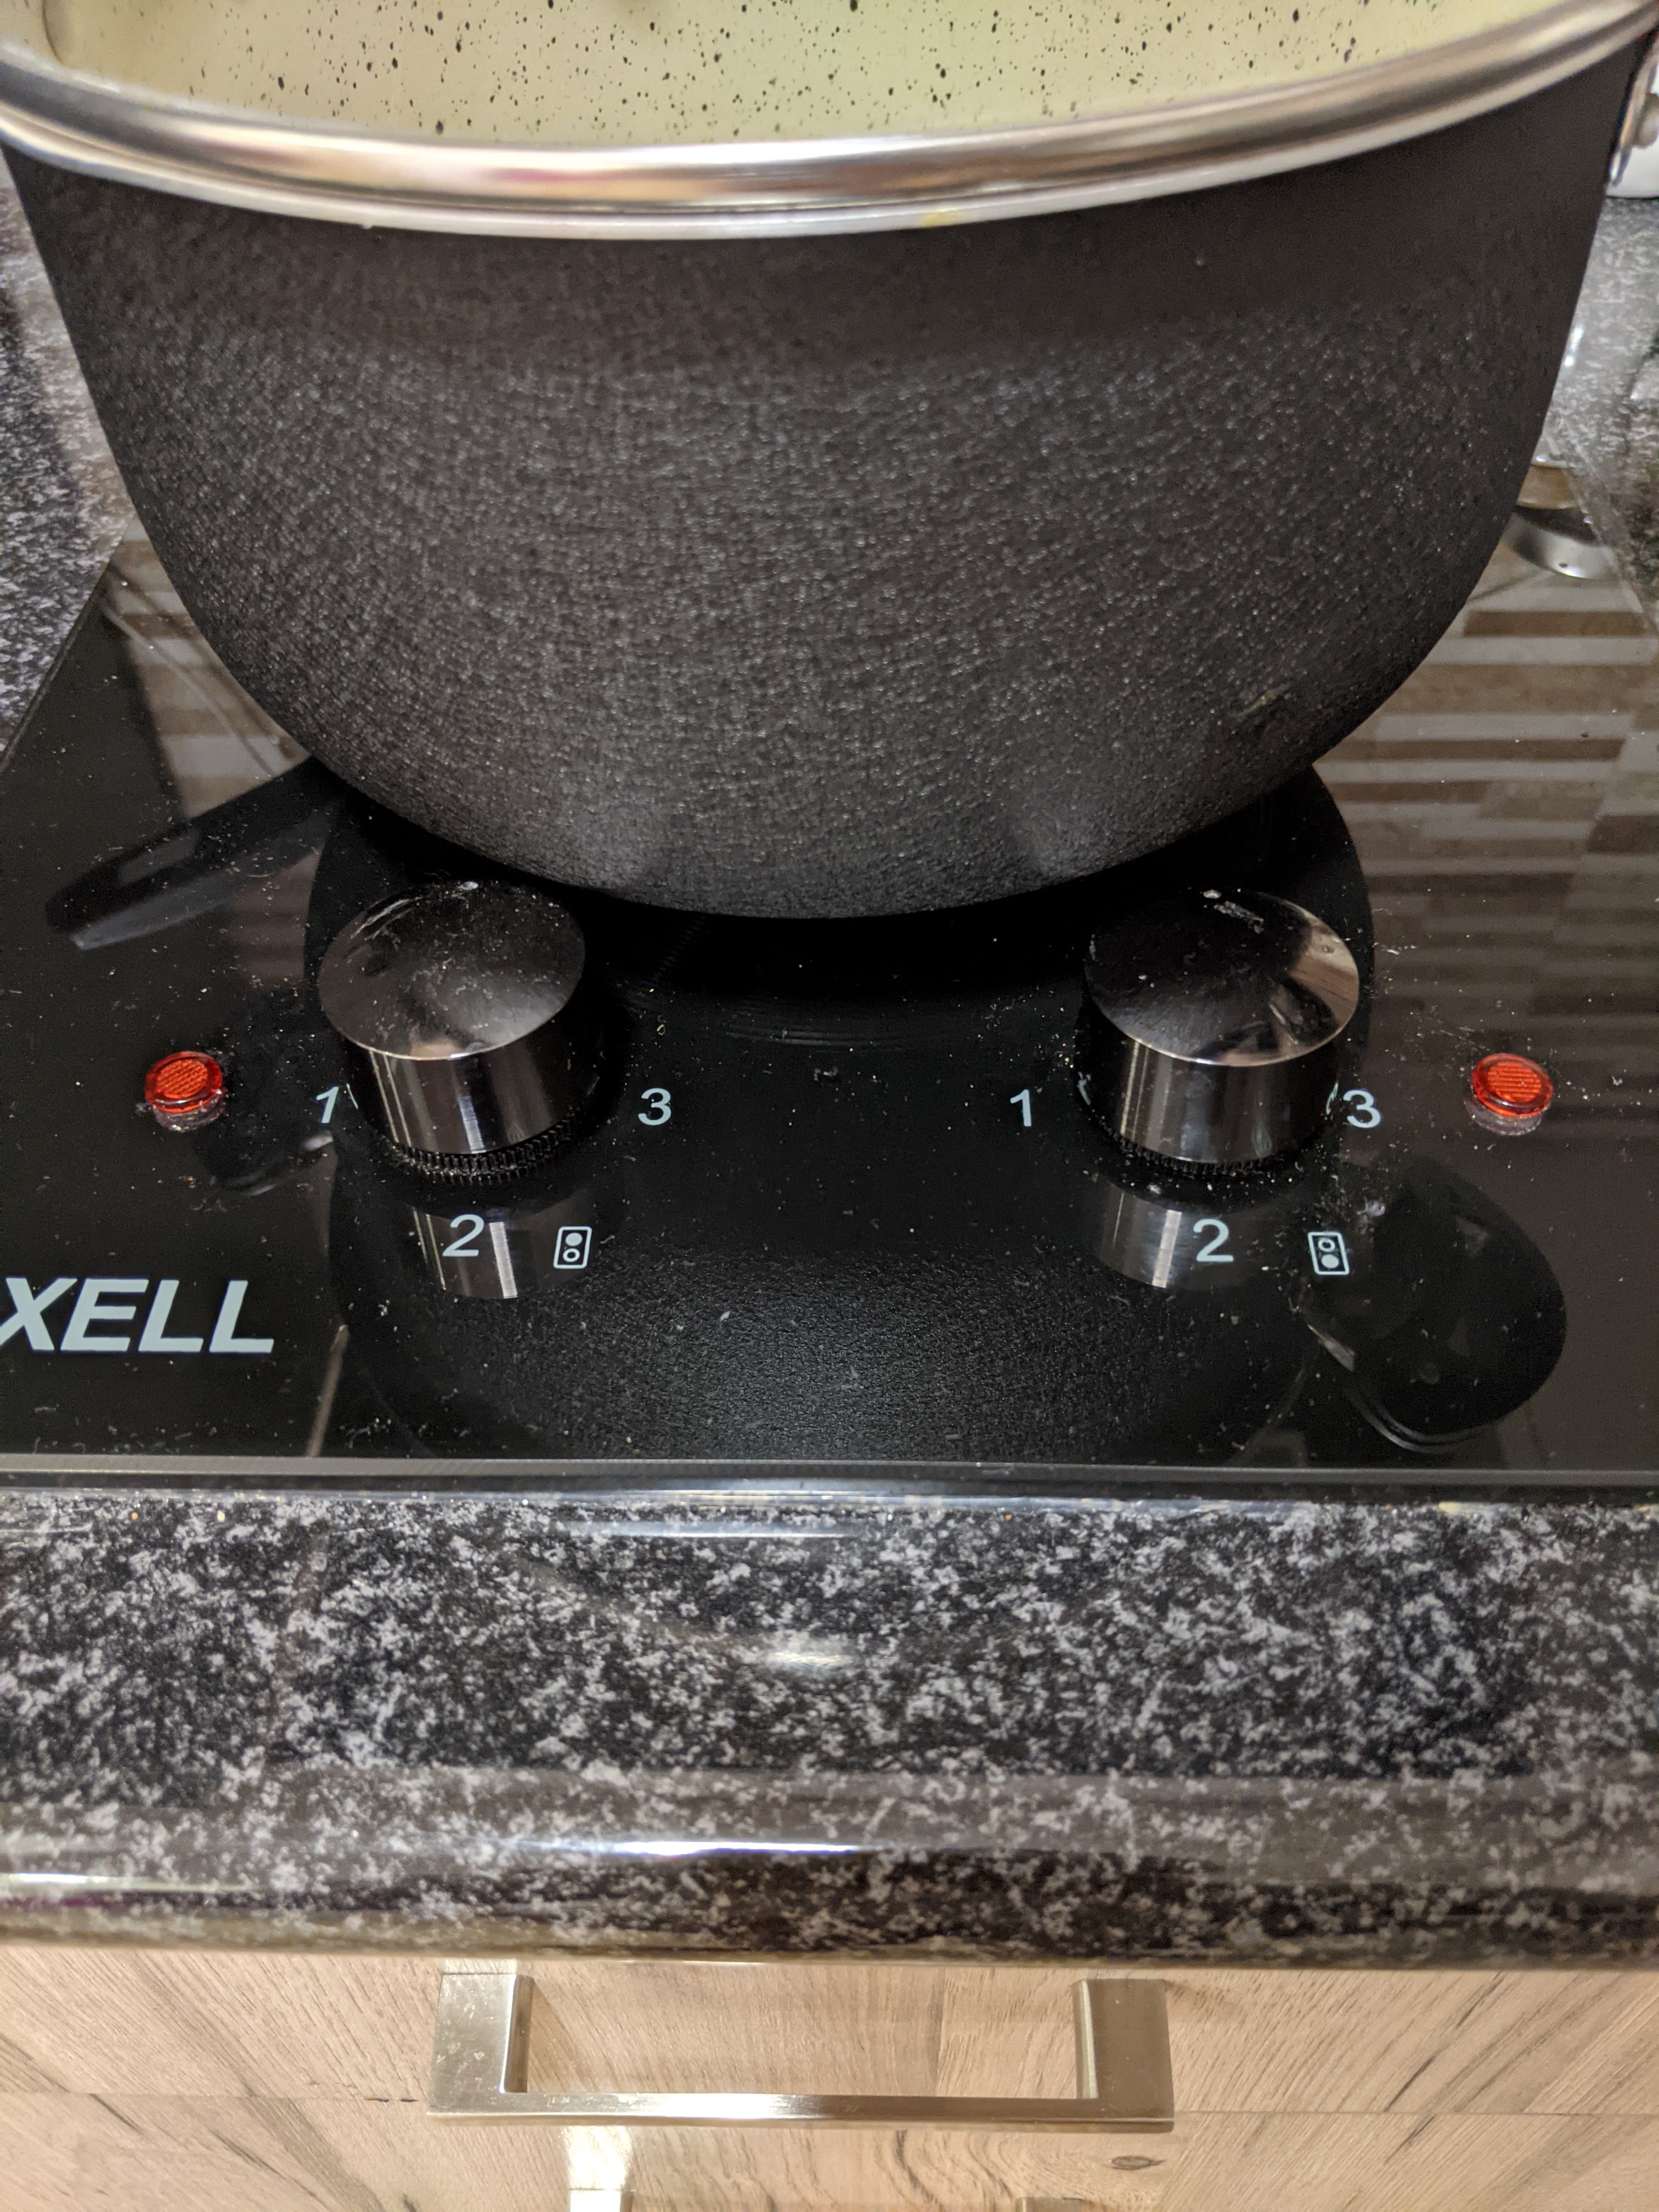
Oh no, my friend, very much no. As you can see we have two stove tops, a small one and a big one. Now, the small one is working very fine. At the highest level it heats more than at lowest level.
But the big one, the big stove top, not so much.
We thought that there’s a problem with that top and used it only during slow emergencies.
One day I come home from work and Lilith is laughing. I asked “what happened?” and she replied “you’re not gonna believe this!”
Well she was right, it’s been couple of days now and I still can’t believe this. I mean if both of the stove tops were in reverse order, I would understand that someone was very Unix-y and they wanted to design it similar to nice.
But when each of those knobs are the exact opposite of each other, it makes you think, “why me?”
Why me indeed.
That’s all folks!
I originally wrote about this on my Armenian blog when ISPs started blocking DNS queries during and after the war. I was forces to use either 9.9.9.9, 1.1.1.1, 8.8.8.8 or any other major DNS resolver. For me this was a pain because I was not able to dig +trace, and I dig +trace a lot.
After some digging (as mentioned in the Armenian blog) I was able to figure out that this affects only the home users. Luckily, I also run servers at my home and the ISPs were not blocking anything on those “server” ranges, so I setup WireGuard.
This post is not about setting up WireGuard, there are plenty of posts and articles on the internet about that.
Over time my network became larger. I also started having servers outside of my network. One of the fast (and probably wrong) ways of restricting access to my servers was allowing traffic only from my own network.
I have a server that acts as WireGuard VPN Peer and does NAT-ing. That being said, the easiest way for me to start accessing my restricted servers is by doing route add restricted_server_addr -interface wg0.
Turns out I needed to write some code for that, which I love to do!
Anytime that I need to setup a WireGuard VPN client I go back to my Armenian post and read there, so now I’ll be blogging how to do dynamic routing with WireGuard so I read whenever I need to. I hope it becomes handy for you too!
Now, let’s assume you need to add a.b.c.d in your routes, usually you’d do route add a.b.c.d -interface wg0, but this would not work, since in your WireGuard configuration you have a line that says
[Peer]
AllowedIPs = w.x.y.z/24
Which means, even if you add the route, the WireGuard application/kernel module will not route those packets.
To achieve “dynamic” routing we could do
[Peer]
AllowedIPs = 0.0.0.0/0
This, however will route ALL your traffic via WireGuard, which is also something you don’t want, you want to add routes at runtime.
What we could do, however, is to ask WireGuard to NOT add the routes automatically. Here’s how.
[Interface]
PrivateKey      = your_private_key
Address         = w.x.y.z/32
Table           = off
PostUp          = /usr/local/etc/wireguard/add_routes.sh %i
DNS             = w.z.y.1

[Peer]
PublicKey       = their_public_key
PresharedKey    = pre_shared_key
AllowedIPs      = 0.0.0.0/0
Endpoint        = your_server_addr:wg_port
The two key points here are Table = off which asks WireGuard to not add the routes automatically and PostUp = /usr/local/etc/wireguard/add_routes.sh %i which is a script that does add the routes, where %i is expanded to the WireGuard interface name; could be wg0, could be home0, depends in your configuration.
Now for add_routes.sh we write the following.
#!/bin/sh

interface=${1}

networks="""
w.x.y.0/24
restricted_server_addr/32
another_server/32
"""

for _n in ${networks};
do
  route -q -n add ${_n} -interface ${interface}
done
And we can finally do wg-quick up server0.conf
If you need to add another route while WireGuard is running, you can do
route add another_restricted_server -interface wg0
Okay, what if you need to route everything while WireGuard is running? Well, that’s easy too!
First, find your default gateway.
% route -n get default | grep gateway
    gateway: your_gateway
Next, add a route for your endpoint via your current default gateway.
route add you_server_addr your_gateway
Next, add TWO routes for WireGuard.
route add 0.0.0.0/1     -interface wg0
route add 128.0.0.0/1   -interface wg0
So it’s the two halves of the Internet 🙂
That’s all folks!